
Mephisto’s Guide to Hand-Watering your Autoflowers in Small Containers: P1 Introduction and the Vegetive Stage
Note: This article focuses primarily on soil growing for indoor gardens
Growing autoflowers in small containers is both challenging and rewarding. Any vessel under 5 gallons (~19L) will eventually require daily or bi-daily maintenance when it comes to providing adequate water to the plants. There are many ways to effectively provide water, but we can break it down into two main categories: Hand watering and automated watering. What's the difference? For the sake of simplicity, we will define hand watering as any form of watering that does not require the use of automation. Many growers choose to use various forms of automation to mitigate the workload. This includes water pumps, self-watering wicking systems, branded products like Blumats & Autopots, etc. The idea behind these automations is that it takes the guesswork and physical act of watering and effectively removes the presence of human intervention.
Why Should You Hand Water Your Autoflowers?
Many autoflowers growers opt right off the bat to set up their gardens with automated watering systems. However, hand watering helps growers to understand the fundamentals of water uptake by requiring careful observation and direct interaction. In short, learning to hand water your plants the right way will help you down the line to better understand your autoflowers' water uptake needs. This information will be important to know even when adopting automated watering systems in the future.
Small containers offer better mobility for home growers. The ergonomics of being able to move smaller autoflowers around in a grow space is difficult when you add in automated systems. Hand watering affords the best compatibility for the mobile container growing lifestyle.
Autoflower growers understand the importance of variety in their gardens. Unlike mono-cropping single strains, many autoflower growers choose to plant many different varietals, all of which will require different nutrients at their various stages of growth. Hand watering makes it easier to observe and make personalized feeding plans for each individual autoflower. Feeding this way may take more effort, but it ensures that each plant gets exactly what they need. Many automated watering systems simply cannot offer this level of precise customization.
When it comes to hand watering, the responsibility is on the grower to ensure that the plants are adequately hydrated. Automated systems, although highly reliable, will still fail every now and again. That could be because a valve malfunctioned, or perhaps a pump shorted out, or even a table flooding, there are lots of problems which could throw off an automated system. Whatever the case, relying on technology isn’t always a sure thing. Sometimes it's better to trust yourself and do it right the first time (and every time thereafter…).
Using Small Containers When Hand-Watering Autoflowers
The fact that autoflowers grow in short cycles makes them the perfect candidates for small containers. We already have an article on how various container sizes affect autoflowers where we detail a full grow with our 3 Bears OG strain and highlight how each container size affected the growth characteristics of the various specimens. You can check out that full blog post here; however, to summarize, we found that our plants favored 3 and 5-gallon containers the most. The 3-gallon plants offer the best morphological characteristics and temperament during the growing cycle. We found that 5 gallon specimens, while offering a larger overall plant, required more overall maintenance.
Containers between 3 and 5 gallons are great for autoflowers because they provide just enough space to comfortably grow a sub-100-day specimen without running out of room for the root zone to develop. Any larger and plants risk stunting due to over saturation and compaction of the soil and any smaller and the plants risk becoming root bound. The disadvantage of small containers is that they need to be monitored far more frequently, with some grow mediums requiring daily maintenance and watering. Many autoflowers are finicky and will wilt even if left unwatered for a partial day.
Considerations Before Hand Watering
The most important variable to consider before hand-watering is your water source. If you are using tap water, make sure you have checked with your local municipality to see what has been added to your water. This most likely will include chlorine and, in some cases, chloramine. By leaving your water out for a day or two before watering your plants, you’ll be able to off-gas the chlorine, but further filtration may be necessary to get rid of chemicals like chloramine.
An important element in hand watering is making sure you have a balanced pH.
For soil growers, water should have a pH of between 6-6.5. You don’t need a fancy pH pen to get an acute reading, test strips and pH dropper test kits are super inexpensive and can be found online. We will dive more into pH and TDS testing in PART 2 of this series when we discuss nutrient feeding.
Plants respond to water differently at varying temperatures, and you can actually negatively impact your autoflower’s development if you feed them water which is either too cold or too hot. Best practice is to acclimatize your water to your garden’s ambient temperatures before feeding your plants.
Aside from the size and maturity of your autoflowers as well as the containers they are in, your plants will uptake water at varying levels based on the temperature, humidity, and airflow of your garden. Warmer temperatures and low humidity will cause your medium to dry faster, low temperatures and high humidity will slow water evaporation. Moreover, proper airflow will allow soil to dry without stagnating.
Hand Watering Through Your Autoflowers Early Life Cycle
-
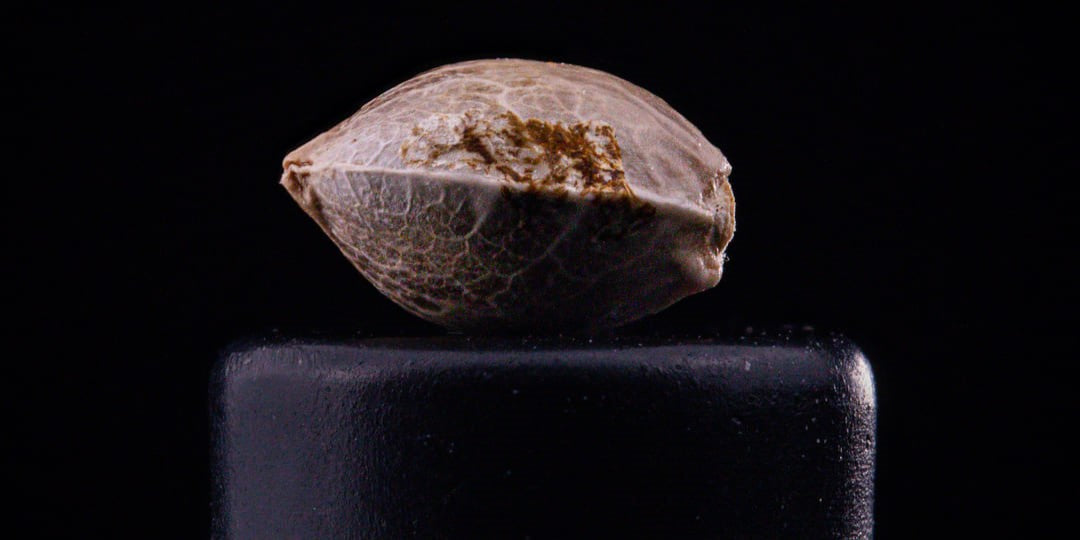
Germination: Whether you are direct sowing, or transplanting a seedling, your medium should be moist. Soil that is too dry risks becoming hydrophobic, creating dry spots that are undetectable and dangerous for developing root systems. Conversely, soil that is too wet, or waterlogged, risks becoming anaerobic, which can suffocate young seedlings or infect them with nasty fungal-born pathogens which can kill them. For soil straight out of a bag, direct sow the seed and then lightly mist or water the center circle around the area where the seed was germinated. Only a half cup of water is needed to encourage the seed to germinate.
-
Seedlings: The size of your container will eventually impact the amount of water you feed your plants. However, during the seedling stage, all plants will require significantly less water. It is during this stage where autoflowers can stunt just as easily by over watering as they can by under watering. For the first week, you should be gently misting or sprinkling around the edge of your seedling less than a cup of water a day. Try not to fully saturate your container until the plants have surpassed the seedling stage and are moving into the negative stage. Pressurized sprayers or spray bottles work really well for watering baby seedlings and for keeping your soil surface from becoming hydrophobic. Clear solo cups, which are often used as makeshift humidity domes, also work well for a gentle watering experience. Just make sure your cup has holes drilled in the bottom, pour water into it, and let it drain in the area around your seedling, Never directly water your seedling at the base, you want that water to be where the roots intend to grow and not saturating the roots themselves.
-
Early Vegetive Stage: Up until and through this point in your autoflower's life cycle, it is important to maintain hand watering by top feeding only. Depending on your container size, your young vegging plants most likely haven’t reached the bottom of the pot yet with their tap root. Autoflowers in most soil systems will not need nutrients of any kind through this phase. Once the plant establishes itself in the pot and nutrients are introduced, bottom feeding has all sorts of benefits. For this stage, water volume should increase slowly over the first two weeks.
-
Mid to late Vegetive Stage: After 2-3 weeks of top feeding small amounts by hand watering, your autoflowers will be mature enough for you to be able to fully saturate the container. It important when top watering over a half gallon that you disperse water flow evenly across the soil surface. Heavy and concentrated water flow will compact the soil, making it less favorable for healthy root development and oxygen dispersion. Watering cans or sprayers work great for creating softer water contact. Once your pots have been fully saturated for the first time, take note of how heavy they weight. This will be your guide for future watering. Picking up pots and gauging their weight is a great way to determine if your autoflower needs water. Light pots mean thirsty plants, and heavy pots mean your plants are either well-fed or waterlogged. Never feed a waterlogged plant; it's best to make sure your environment is dialed in and let the plant use the moisture it has.
Troubleshooting during the Vegetive Stage
During these first few stages of your autoflower’s lifecycle, you may encounter a few issues associated with watering.
-
Yellowing, spotted or decaying leaves: This may be an indicator of early pH imbalances. Your seedling and plants in early veg are uptaking nutrients that are available in the soil. If your plants are showing signs of deficiency this early, chances are that there is a nutrient uptake lockout occurring in the soil that most likely is a result of a pH imbalance. For this, make sure to flush your container and pH test some of the runoff to get an idea as to how you’ll need to adjust.
-
Yellowing leaves curled inward: This may be a sign of overwatering. The root system, in this case, is waterlogged and deprived of oxygen. Correcting environmental factors and allowing the soil to dry out is the best thing to do to mitigate waterlogged containers.
-
Wilted curly leaves and a bent-over meristem: These are signs that your container is under-watered. Underwatering may not not a death sentence and is certainly not as bad as overwatering your plants. However, if left underwatered for too long, plants may not be able to recover. If you see wilting, and your soil surface is dry or your pots are light, water immediately. Also, in these cases, make sure you spray the soil surface first in order to break that hydrophobic barrier. Otherwise, that water will just trickle down through pockets and drain from the bottom without actually hydrating your roots.
Your hand-watering strategy will change up once your plants transition into the flowering stage. Depending on your system, nutrients will most likely be involved, and the frequency/quantity you water with will fluctuate. In volume 2 of this series, we will discuss effective methods for hand-watering and feeding nutrients during the final phase of the autoflower lifecycle.
Cheers friends, happy growing!
Jimbo, out.
related blogs.
Check out these other blog articles.

Rainbow Sundae 11 - A Brand New Artisanal Drop!
Rainbow Sundae 11 F5 [RS-11 x Sundae Thumper] drops June 15th! Come inside and check out the details.

New 1/4 Pound Mephisto x Grove Bags On The Way!
New ¼ Pound Mephisto x Grove Bags are on the way! Check out the details here

First Steps of Training Autoflowers - by breadbox_grows
Getting started with training your autoflowers? Tester breadbox_grows gives us his insights into the methods he uses to maximise his own yields!

Autoflowers, Their Time to Flower and How To Maximise Yields in Small Containers - by Zer0Tolerance
Can you really pull over 4oz from a 1/4gal grow? Tester Zer0Tolerance breaks down the science and methods behind maximising yields in tiny containers.

Mephisto Genetics 420 Sale Incoming....
420 is right on the horizon and sales are coming! Check out the details and a sneak peek at something special coming soon.

Butters’ Breath - A Brand New Artisanal Drop!
Butters' Breath F5 (Peanut Butter Breath x Creme de la Chem) drops on April 13th! Come inside to read the details.

Bear Force One - A Brand New Artisanal Drop!
Bear Force One is dropping on March 16th! Come in and check out what it's all about.
2026 American Autoflower Cup Recap!
A recap of all the events of AAC, with Mephisto dominated the highest THC strains. Come check out what we got up to!

Guava Fig - A Brand New Artisanal Drop!
One, two, three and to the fo’. B-R-A-D and Guava Fig is at the do’. Guava Fig drops on the 26th of January at 1pm EU, 12pm UK, 7am Eastern, 4am Pacific! Come and check out the details.

Mephisto Year in Review 2025
Happy Holidays Meph Heads! Come and read our end of year review for 2025. Much love, Mitch 💚